
Staining a fence can dramatically enhance your yard’s appearance while protecting the wood from weather damage. Using a sprayer for this task is faster, more efficient, and ensures even coverage, especially for large or textured fences. In this guide, we’ll walk you through everything you need to know about how to stain a fence with a sprayer, from preparation to finishing touches, plus tips, comparisons, and expert advice.
Short Answer: How to Stain a Fence with a Sprayer
If you’re in a hurry, here’s the quick answer: prep the fence by cleaning and sanding, choose the right sprayer and stain, apply using even passes, touch up missed spots with a brush, and allow proper drying.
Essentials for a smooth staining process include:
- Thorough fence preparation (cleaning, sanding, repairs)
- Proper sprayer setup and testing
- Protective gear and ground coverings
- Spraying in suitable weather conditions
For an average 6-foot, 100-foot wooden fence, using a sprayer typically takes 2–4 hours for application, depending on coat layers and fence condition. Drying usually adds another 24–48 hours.
Why Use a Sprayer to Stain Your Fence?
Benefits of Sprayer vs. Brush or Roller
Sprayers have several key advantages over traditional brushes or rollers:
- Time efficiency: A sprayer can cover a large fence in a fraction of the time it takes with a brush.
- Even coverage: Sprayers deliver a smooth, consistent coat without streaks.
- Reaches hard-to-access areas: Fence tops, corners, and textured surfaces are easier to cover.
Situations Where a Sprayer Is Ideal
- Large fences: If your yard has extensive fencing, sprayers save significant time.
- Textured or uneven wood: Sprayers reach crevices that brushes and rollers might miss.
- Quick DIY projects: For homeowners wanting fast, professional-looking results, sprayers are ideal.
Preparing Your Fence for Sprayer Staining
Proper preparation is crucial to achieving a long-lasting, attractive finish.
Inspecting and Cleaning the Fence
- Remove dirt, mold, and old peeling stain: Use a stiff brush or scraper for peeling areas.
- Power washing techniques: For stubborn grime, a power washer at low pressure cleans deep dirt without damaging the wood.
Sanding and Repairs
- Fill cracks or holes: Use an exterior-grade wood filler for a smooth surface.
- Sand rough surfaces: Sand uneven or splintered boards to ensure the stain adheres evenly.
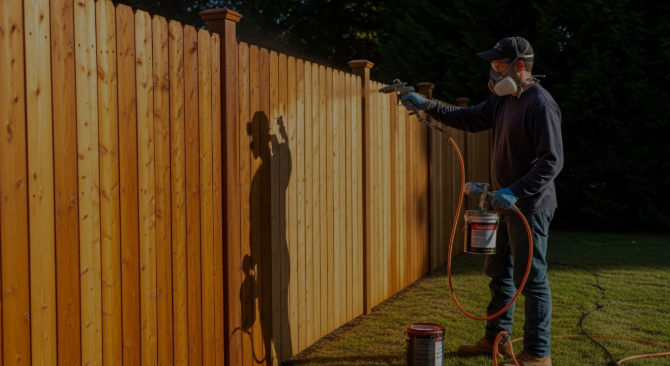
Safety and Environmental Precautions
- Protective gear: Gloves, goggles, and a respirator mask are recommended.
- Ground protection: Lay down tarps to prevent overspray on plants or grass. Avoid windy days to reduce stain drift.
How to Stain a Fence with a Sprayer
Step 1 – Choose the Right Sprayer
Two common sprayer types:
| Type | Pros | Cons |
|---|---|---|
| Airless Sprayer | Fast, handles thick stains | More overspray, requires cleaning |
| HVLP (High Volume Low Pressure) | Smooth finish, less overspray | Slower, smaller coverage |
For large fences, an airless sprayer is typically faster and more practical.
Step 2 – Select the Best Stain
Consider the following options:
- Oil-based: Deep penetration, long-lasting, ideal for older wood.
- Water-based: Quick drying, easy cleanup, environmentally friendly.
- Semi-transparent: Shows wood grain, moderate UV protection.
- Solid: Provides full coverage, hides imperfections, maximum protection.
Step 3 – Prepare the Sprayer
- Strain the stain to remove clumps.
- Thin if required according to the sprayer’s manual.
- Test spray on scrap wood to ensure proper flow and coverage.
Step 4 – Apply the Stain
- Hold the sprayer 6–12 inches from the fence.
- Spray at a consistent speed and angle, overlapping passes slightly.
- Work section by section to avoid missing areas or drips.
Step 5 – Touch-Ups and Finishing
- Use a brush for hard-to-reach spots or uneven areas.
- Clean the sprayer immediately after use to prevent clogging.
- Store unused stain in airtight containers.
Step 6 – Drying and Curing
Full curing may take up to 1 week, after which the fence is fully weather-resistant.
Typical drying time: 24 hours for water-based, 48 hours for oil-based.
Avoid spraying if rain or high humidity is expected.
Sprayer vs. Brush vs. Roller for Fence Staining
| Method | Pros | Cons | Best For | Time Required |
|---|---|---|---|---|
| Sprayer | Fast, even coverage, reaches corners | Overspray, prep needed | Large fences | Shortest |
| Brush | Precise, little overspray | Slow, labor-intensive | Small fences, touch-ups | Long |
| Roller | Faster than brush, even coverage | Hard to reach corners | Flat fences | Medium |
Common Mistakes When Staining a Fence with a Sprayer
- Uneven coverage due to inconsistent spraying.
- Holding the sprayer too close or too far from the fence.
- Ignoring weather conditions; rain can ruin fresh stain.
- Failing to prep the fence, leading to peeling or blotchy finish.
FAQs About How to Stain a Fence with a Sprayer
1. How long does it take to stain a fence with a sprayer?
It typically takes 2–4 hours for a 100-foot fence, depending on coat layers, wood type, and weather conditions.
2. Can I use any type of stain in a sprayer?
Not all stains work in all sprayers. Water-based and thinned oil-based stains are most compatible. Always check manufacturer guidelines.
3. Do I need to sand the fence before spraying?
Yes. Sanding ensures smooth adhesion and prevents blotchy coverage.
4. How do I prevent overspray on plants and grass?
Use tarps, cardboard shields, or painter’s tape to protect surrounding areas.
5. Should I stain in one coat or two coats?
One coat may suffice for new wood, but older or porous fences often need two coats for full protection.
6. What maintenance is required after spraying?
Inspect annually for fading or peeling. Clean and reapply stain every 2–3 years depending on exposure.
7. Can I use a sprayer on a painted fence?
Yes, but ensure the paint is intact. Peeling paint should be removed and repaired first.
8. How do I clean the sprayer after staining?
Flush with water for water-based stains or mineral spirits for oil-based stains. Disassemble parts for a thorough clean.
Conclusion
Staining a fence with a sprayer is an efficient, professional-looking method for protecting and beautifying your wood fence. By preparing the fence stain properly, choosing the right sprayer and stain, and applying the stain with correct technique, you can achieve a flawless finish. Avoid common mistakes, protect your surroundings, and allow sufficient drying time to ensure long-lasting results.
With careful planning and execution, staining a fence with a sprayer can transform your outdoor space while saving time and effort compared to traditional brushing or rolling methods.